
Dynamic Units:
All of the default presets utilize a dynamic unit type. This mean the individual units (studios, 1 beds, 2 beds, etc.) stretch to fill the footprint of the building. Additionally a target mix and unit average is used to solve the building layout. You can adjust the mix and size of the units as you need.
Example:
We asked our dynamic 2 bedroom units to be:
- 1200 square feet
- Consume 35% of the units of our building.
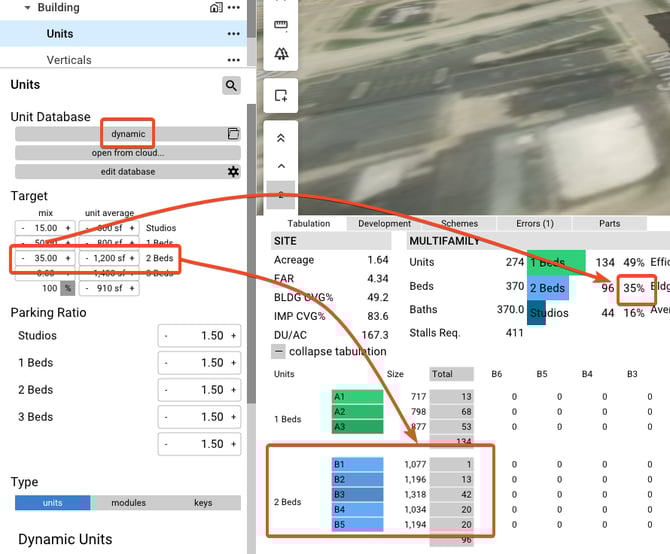
This resulted in an exact percentage of 35%, and units ranging from 1,077 square feet to 1,318 square feet with varying options between.
In the lower portion of the properties panel you can control global values of all the units in the building.
Unit depth: Controls the overall depth of all the units in the building.
Inside corners: When toggled off: removes units from being placed on the inside of the building. Is often used when things like mechanical rooms or Back-of-House rooms need to be placed in corners.
Bifurcate corners: Bifurcates all the corner units of a building.
Corner spacing: Controls additional distance on the inside corner units.
Inset depth: controls the inset depth of inside corner balconies.
Dead ends: Disables or enables the use of dead end units at the end of corridors. 
Balconies: Enables/disables the placement of balconies on all units of the building.
Balcony width: Controls the width of all the buildings balconies.
Balcony depth: Controls the depth of all the buildings balconies.
Balcony inset: Controls the inset of all the buildings balconies except inside corners.
Balcony height: Controls the height of all the buildings balconies.
Adjusting the parking ratio:
Select the Units layer and enter the parking ratio you require for each unit size:

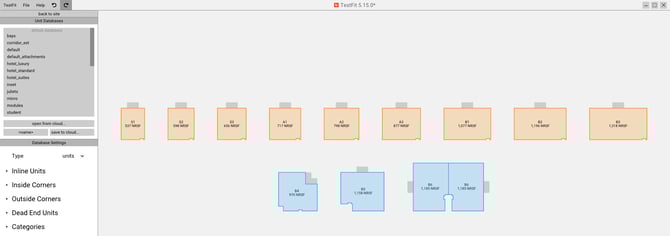
Using a Unit Library / Kit of Parts:
If you have exact/specific unit sizes that you need to utilize within your building, you will need to apply a kit of parts and create the unit sizes.
With the Units layer selected, click edit library and then convert to a kit of parts.
You are now in the unit library and will see all of the existing units from the current solve. In the image below we notice the building contained 3 different size studios, 3 different size 1 beds, 3 different size 2 beds, 0 3 beds, an inside corner unit, an outside corner unit, and was solving with dead end units:
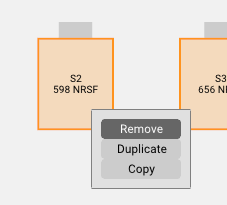
If you only want one specific floor plan of each, right click on the extra units and click remove.
Eventually your kit of parts will look similar to this layout: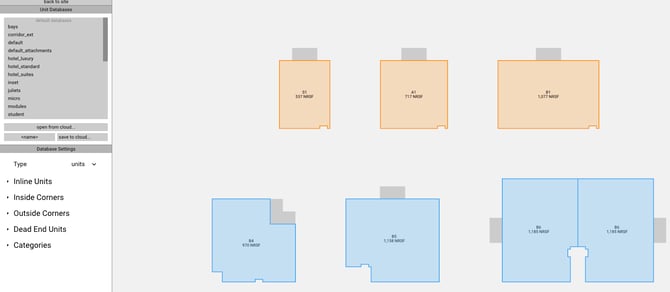
Should we need an additional bedroom size, such as a 3 bedroom option, click the add unit button from the Inline Units option in the left panel.

You will find yourself in the individual unit editor, make sure to change the name, adjust the category, and increase the bed count for accurate tabulation reporting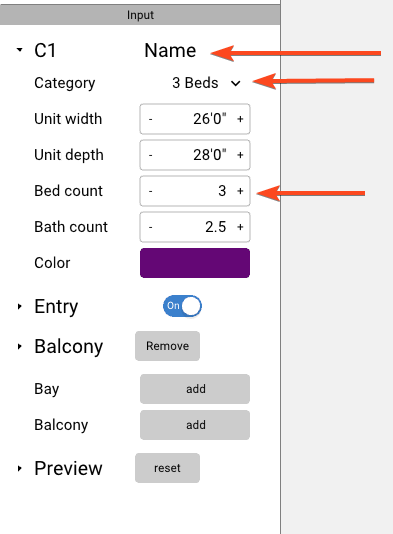
You can now adjust the units depth, width, balcony location, additional balconies, bays, and resize/relocate the entry.

This 3 bedroom unit will now always utilize this exact size. It is no longer dynamic. It will no longer stretch to fill the building footprint.
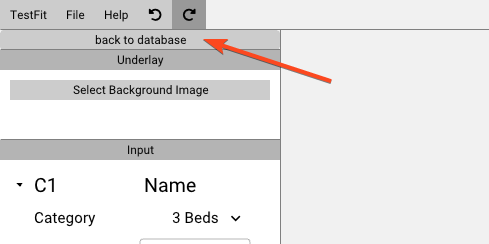
Click back to library and repeat these edits to the remaining unit layouts by clicking on them in the library.
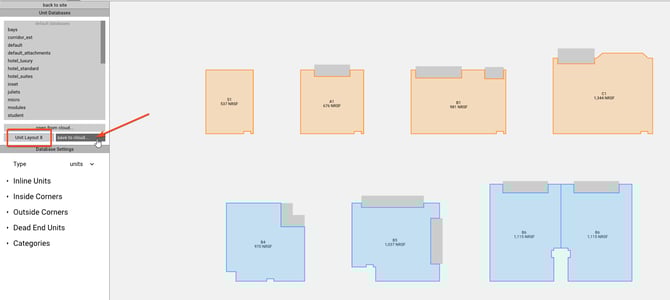
Once you've modified all of the units in the library, you can save it to your assets folder and apply it to future solves. Give the set of units a name and click save to cloud
Click back to site to see your units applied to the building. You'll notice that the dynamic portion of the unit properties are gone and there is no longer a target unit average.

Definitions & Deeper Explanations
Default Library
The following unit libraries come installed in TestFit.
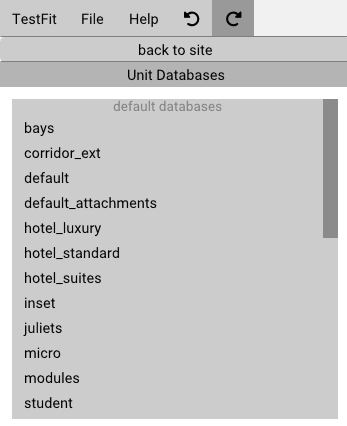
- Bays - units with extended bays.
- Corridor ext - instead of an outside corner unit, corridor will extend to the end of the building mass
- Default - traditional units
- Hotel - module based units
- Luxury
- Standard - Smallest units
- Suites - Largest units
- Inset - balcony will be inset
- Juliets - 6 inch balcony
- Micro - small units
- Modules - units
- Student - units for standard student housing
- Urban - larger units for urban living
Library Settings definitions

- Inline Units - non corner or dead end unit
- Inside Corners - corner units inside the building mass
- Outside Corners - units located outside the building mass
- Dead End Units - units located at the end of a corridor
- Max linear Flex - a metric that allows TF to slightly flex the unit size to solve
- Min Angle - the boundary where the inside and outside corner units begin
- Max Angle - the boundary where the inside and outside corner units end
- S - Studio - no bedrooms and one living space
- A - One Bedroom – one bedroom and one living space
- B - Two Bedroom – two bedrooms and one living space
- C - Three Bedroom – three bedrooms and one living space
- <new category> - create a new unit category success
Library health
The possible linear unit configurations (inline unit score) estimates the percent of how likely TestFit will solve a corridor without allocated areas.
Input Panel
Make changes to the unit
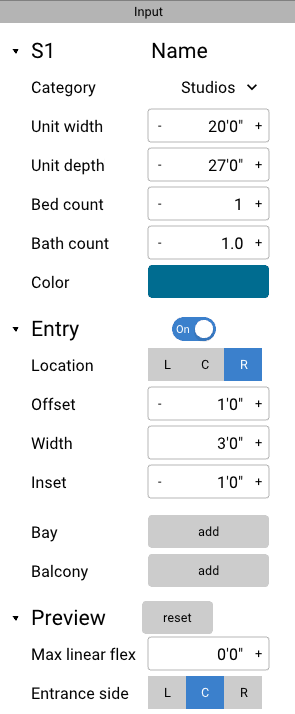
Name
- Category - 1,2,3 bedroom
- Unit Width
- Unit Depth
- Bed Count
- Color
Entry
- Location - sets the entry to the Left, Center, or Right
- Offset - sets the distance from the wall
- Width - sets the width of the entryway
Balcony
- Location - sets the balcony to the Left, Center, or Right
- Offset - sets the distance from the wall
- Width - sets the width of the balcony
- Depth - sets the depth of the balcony
- Inset - sets the distance of the balcony inside the unit.
Bay
Interior space project out from the exterior of the building
- Location- sets the bay to the Left, Center, or Right
- Offset - sets the distance from the wall
- Width - sets the width of the bay
- Depth - sets the depth of the bay
Add Bay - Adds a Bay
Add Balcony - Adds a Balcony
Unit Editor Output

- NRSF - net rentable square footage
- Balcony - balcony area
- Common - common area created by the entry
- Demising - total length of walls on the sides of the unit
- Internal Skin - total length of walls adjacent to the common area
- External Skin - total length of walls on the building facade
- Bedrooms - number of bedrooms
- Bathrooms - number of bathrooms
Attaching an underlay
- Select the unit you'd like to add a background image to
- Hit the Add Background Image button
- Find image you'd like to add
- Scale the image from a known dimension
- Adjust the size of the unit to match the underlay